I was listening to the morning show on my favorite radio station and they were talking about dating in your marriage. They talked about the benefits of dating and if it was worth it or even possible. It got me to thinking about my own marriage.
We have been married for only 2 years but we have been living together for nearly 9. We have had our ups and downs, and when I say "downs" I mean into the depths of the abyss. Okay, okay, that is a little dramatic but we have had our problems.
I was talking to someone the other day, and I can't remember who, but probably my best bud Katy. It was made known to me that my relationship with my husband didn't start out the way most relationships do. I would say for the most part relationships are usually pretty happy and romantic for at least the first year. By the second year, it's still pretty good but a little rocky. By the third and maybe fourth year, your relationship might be suffering. Once you get through the fourth year it gets easier. That's of course, not always the case but from my point of view, from the people I know, this is pretty typical.
My relationship started out good for about a month. We spent the next four years in serious dislike of each other and bound and determined to keep it going anyways. We learned a lot about each other and came to realize that some things are just not worth being mad at. We still fight, but we do our best to forgive and forget.
Here are my 5 tips for a happy marriage that I have learned over the years based on my own relationship with my husband.
5. Don't hold grudges. Seriously, let it go. Don't let little things get in the way of being happy. Every month I get a little snappy. I usually need ice cream during that same time in the month. I know it drives my husband nuts. Probably as nuts as it drives me that he constantly leaves the cabinets in the kitchen open. But, we deal with it. We accept that we have flaws and we let it go. Why ruin a perfectly good day by getting aggravated unnecessarily?
4. Have date nights. At least once a month if you can. I know it's hard sometimes especially if you have kids. I don't have kids but I do have responsibilities as a caregiver and I am fully aware of the difficulty of getting away, but I think it is very important to actually get away.
3. Try to go to bed at the same time. My husband always winds down around seven in the bedroom. He watches the history channel and just relaxes before bed. I try to get in there around the same time. I goof off on the internet and we play with the dogs and talk about our day or just talk in general. It's good to stay connected with each other.
2. Have a financial budget. Once of the biggest stabs in a relationship is money problems. It puts a kink in just about every area of your relationship. Have a clear cut budget and stick to it so that a stupid thing like money doesn't get in the way of a happy marriage.
1. Stay intimate. Not just in the sack. (That's a romantic way of putting it isn't it?) Hug each other. Kiss each other. Say I love you. Humans need physical contact and if you and your spouse rarely touch then chances are that isn't the only problem in your relationship.
These things have helped our own relationship and maybe it will help you too.
Leave comments below and check out my website. www.projecthousewife.com
Tuesday, January 14, 2014
Friday, January 3, 2014
Happy New Year!
I hope everyone out there had a wonderful holiday! I know I did, but I am excited about what 2014 has to offer.
I try not to make resolutions. I never seem to keep them and end up feeling a little depressed about it. I do have big plans this year and whether or not I accomplish them remains to be seen, but I plan on having lots of fun trying.
First off, I want to congratulate S.G.Tillery, an up and coming author, and my best friend's sister-in-law for publishing her book. You can find 'Mystic' on Kindle. I am on chapter 3 and so far I find it very interesting and I am really looking forward to seeing where it goes.
Seeing someone publish a book made me wonder how long I plan on sitting on my own book idea before I actually sit down and write it. So one of my plans this year is to write this book that has been dancing around in my head for years. Even if it never becomes a hit, and even if everyone hates it, I will be glad that I finally accomplished it.
I really want to take Project Housewife to the next level. These last several months of playing around with the video camera and blogs and website have been fun, but it's time to have more followers out there so that I am actually entertaining others besides myself. I really hope to make my Youtube channel more popular, and have several skit type videos in mind. I also plan on doing some product reviews for household items and some pinterest nailed it or failed it videos. I think having some guest housewives on would be awesome too.
I also plan to blog more. More than anything, I thinking blogging will help me in my overall writing technique, so I can accomplish that book.
Another plan I have in mind is to lose weight. Seriously this time. I am getting older and it's actually starting to affect my health. Also I would like to squeeze out at least one child in this lifetime and if I keep this weight on it may never happen.
I am going to join the weight loss competition at my husband's work and hopefully this will keep me motivated. I hope to win so that I can get another tattoo. I am itching for a new one. Seven ink spots just isn't cutting it anymore.
These are my plans, at least the ones I can think of right now. I think I may have some serious ADD and I need to sit down and make a list of everything I want to do. I am working on a binder to help organize my life. It was put on hold until I took down the decorations and get my craft area in order. Now that those things are done maybe I can finish that part up.
That's all for now. I never know how to end these blogs properly. I always want to end it like a journal.
Until next time!
XOXO
Love Kris!
Sunday, December 8, 2013
Christmas Tree Angel made from Glade Solid Air Freshener
Several years ago I got an itch to make a tree angel. I say "make" because rarely do I have the cash to buy a bunch of stuff. Plus, I have always felt great satisfaction in making my own things. I can't help it. Crafting is just part of who I am.
I also have a tendency to collect crafting supplies. Sometimes it's from garage sales, and sometimes it's from my mother. Every so often she clears out her crafting hoard and if she offers it in my direction I snag it up. This has saved me lots of money. I always try and use what I have on hand before I go out and buy anything.
That's how this came about.

This is my tree angel. I have had it for about 5 or 6 years now. I had some old vintage looking lace (from my mother) and wired ribbon. I never really have a plan when I go to make things. I just fly by the seat of my pants and hope it comes out. This time it did.
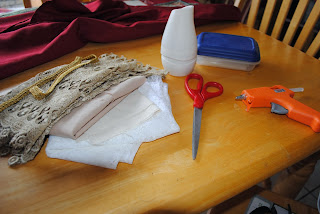
You will need the following:
Scissors
Hot Glue Gun with plenty of sticks
A used Glade Solid Air Freshener
Lace and Ribbon and Clothe
Now, when I say use a Glade Solid Air Freshener, it can definitely be a generic brand. I'm not product pushing here. The reason I used this product for my angel is because it had the right shape. I love putting these things in the bathroom.

Take the top of the air freshener off. This is the base of your angel. You can just throw that bottom part away.


I took a solid color to make the first layer. I just laid it on top of the cone and hot glued it down. It doesn't have to look pretty. It's just the first layer.


The next layer is the lace. This is a white lace that is thin enough that you can see the tan underneath. You are going to want this material to come out a little smoother. I just cut a piece out and wrapped it around. The second picture you see here is the front and the third is the back. Try and have your glued down pieces in the back.


I next cut a piece of clothe in half and rolled one have into a ball. I then wrapped the ball in the second piece of clothe making sure one side of the ball is smooth. This is the head of your angel. just glue that down on the top of the cone.

I took another piece of lace in a different color and wrapped it around the neck line so that it wouldn't look so "neck less".


For the hair, I used some kind of bordering type lace. It's kind of braided. I'm not sure what it is called. The hair placement should cover up the back of the angels head where it probably isn't so smooth looking.


I took some lace that matched the dress and folded it into a strip and then tied it into a bow and glued it on the back. This is the wings of your angel. On my first angel I used some wired ribbon, but this time I didn't have any that would match. Either way will look very pretty.

I took a strip of this fancy gold cloth ribbon and glued it on the angels head to make a halo.

The face is very simple. I just used a sharpie marker. Press very lightly because it will easily bleed through. I basically made two little smiles for the eyes.

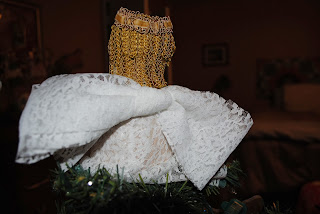
Here is my new angel on the tree. Front and back versions.
The cool thing about this is you can make different kinds in different ways in different colors. My first angel has arms but this one doesn't but they both look pretty good.
I hope you enjoyed this and if you make one I would love to see a picture of it.
Merry Christmas!
Thursday, November 21, 2013
Where am I with this Project
It's been a couple of week's since I have posted a blog, or a recipe blog, or a video. I have been super busy. Sometimes life just get's in the way. I had a whole schedule planned out but nothing is lining up properly.
I have been dealing with sick family members, and the never ending cleaning that is my house. Plus, I decided to go ahead and put up my Christmas decorations. I tried to wait until after Thanksgiving, but I just felt to festive to wait.
I have also been dealing with my anxiety. I feel like I shouldn't talk about it but hey, let's be honest, everyone has some little issue and mine is anxiety.
Anyways, I haven't been keeping up with Project Housewife the way I ought to, but I will try and do better. I appreciate anyone out there who is paying attention to me right now.
I have only a handful of people paying any attention and I hope to gain a bigger following, but if I am helping anybody out there, or making anyone's life more enjoyable for even a brief moment, then I guess this is all worth while.
Talk to you soon.
Friday, November 8, 2013
The Month of Thanks
November is a great month. Here in Texas, things finally start to cool down temperature wise. We can finally wear sweaters without getting hot half way through the day.
I have a substantial bubble gum stash after Halloween was over, and now I have begun my semi yearly cleaning to get ready for Christmas. I have lots of cleaning to do this year it seems too. A lot of dust seems to have accumulated in places unseen around the house and I only hope my allergies can take it.
I always decorate early for Christmas but I still completely love Thanksgiving. I am one of those people who updates their Facebook status with a daily thanks, and I even started on time this year too!
While I appreciate everything and everyone in my life, sometimes it's good to voice it out loud. (or over the social media in our new technological world.) So here it goes,
I am thankful for my husband, who works so hard to provide and take care of me. He has a great sense of humor, and a great butt too. I love that he will blush when he finds out that I just wrote that. He is kind and loyal almost to a fault, and will always be there to help someone out. Love him.
I am thankful for my Mommy. We butted heads a lot when I was a teenager, but have become so very close through adulthood. I love her so much, and she is the reason I am who I am today. I am proud of her.
I am thankful for my Dad. I know he is smiling down from Heaven right now. He was a great dad. He loved his girls and he was always a lot of fun. I miss you Dad.
I am thankful for my Stepdad. He is great to my mom and makes her happy. He is always upbeat and he is such a sucker for dogs. It's cute.
I am thankful for my sister Yiff. She is always great to talk to and a wonderful mother. She is really good at bargain hunting and I like to go garage sale hunting with her. She has great skin.
I am thankful for my sister Cat. She is a wonderful mother and I am most like her. She has a warped sense of humor and doesn't take crap from anyone. I am usually jealous of her hair styles.
I am thankful for my sister Stacilet. She is a wonderful mother and a great representation of a true Christian. I love her house and the way she decorates.
I am thankful for my sister J. She is my best friend. I am so glad we are so close now and I don't know what I would do without her.
I am thankful for my brother in laws who take care of my sisters and nephews so well.
I am thankful for my nephews and my niece. I love them all so much. They all have such different personalities and life is NEVER boring when they are around.
I am thankful for my husband's family. Especially his parents. They are so kind and caring and have always been there for us.
I am thankful for my best friend Kate. Even though we go through some droughts in our friendship we never forget about each other and love each other. Miss you lady.
Most importantly I am thankful for my Lord and Savior Jesus Christ. I would be nothing without Him.
I am thankful for so much in my life. My husband and I have come so far since we first met. I am so thankful that we don't live in that crummy first apartment we had together, where holes were patched with bandaids and paper - literally (apartment management doing) and our couch was a mattress on the floor.
Life is good, and even if the road gets bumpy in the future, I have good people to help me get through it.
I love you all and I hope you have a great Thanksgiving!!
Monday, October 21, 2013
Renaissance Fair Feathered Hand Fan

A couple of weekends ago my husband and I took our niece to the Texas Renaissance Festival. It was very fun. We camped on the grounds and I made up costumes or "garb" for us to wear. I knew it would be warm, but didn't factor in the humidity.
I would take 100 degrees in dry heat over humidity any day of the week. You just feel like you are melting. I should have gone as a witch. I'm sure my husband thought I was one.
Upon entering the gates of the festival I had a panic attack. It never occurred to me that I suffered from such attacks but thinking back I obviously do. The combination of dozens of people surrounding me and being extremely hot at 9 o'clock in the morning had me in a quiet fit. I ended up cutting in line. I mean, it was more like a swarm than a line, but I am sure people noticed me shamelessly squeezing my way to the front. I didn't care. I just needed to sit down for a second so I could breathe and cool off.
Once I got in the gates I immediately found a place to sit as my husband and niece ran off to get me something cold to drink. If you follow my videos on Youtube ( www.youtube.com/projecthousewife)
you can see a clip in my Renaissance video of just watching people come into the fair. I figured while I calmed down I could make use of the time.
Once I was back up and walking around, I made it my mission to find a hand fan. While we cruised around the shops looking at various swords and costumes, and other fantastic items that one can only find at a ren fest, I saw several people fanning themselves. I finally found a pirate shop selling fans, which now as I sit here typing, I can't remember where I put.
One thing I noticed was several people fanning themselves with fans made of feathers. It looked so awesome. I loved the idea. I knew if I found one at a shop it would cost much more than I was willing to spend. So I decided that when I got home I would set out to make one of my own.
I figured I would share with all you fine people out on the web as well, because my motto is, "If I can make it myself, then I'm gonna".
I generally just wing it when I make things. I went to Hobby Lobby and grabbed a bunch of stuff that I thought could work and just went nuts.
We are going to another Renaissance Festival in February and I decided to make a hot pink and black outfit to where. I realize that it is hardly historically accurate, but neither are the fairies and other mythical creatures that I see at the fair. Plus, Pink is my FAVORITE color.

Things you will need:
Sheet of felt
Hot glue gun with plenty of sticks (DON'T BURN YOURSELF - CAUTION)
Feathers
Floral wire
some meshy paper rope (I don't know what it's called)


First thing you are going to do is take the floral wire and create a basic shape. I shaped the fan part very simply, and it doesn't have to be too big because it's just a base. I then worked the wire into a stem and then at the end is just a loop. This will make it easy to tie to a belt when I take it to a festival.


I then took the meshy paper rope stuff, and unwound it, so that it was more like ribbon than rope and just basically wrapped it around the wire. This helped hide the wire but it also helped when it came to gluing on the feathers.

Next you glue on the feathers. I chose feathers that had a natural curve to them and didn't look eaten up because several feathers didn't look good. I glued the feathers so that they curved in on the fan and weren't straying everywhere.
I had three colors, black, light pink, and hot pink so I layered the colors. You can display yours however you like though.


On one side of the fan I cut out a piece of felt to lay over the feathers to hide all the little end parts, and to solidify their place on the fan. On the other side, which I consider the front, I placed a pre-made feathered felt piece.
And here is the finished piece.

This fan works really well and I really love it. The only thing I would add to this is a stiff stick to connect the fan part to the stem underneath the paper. The wire bends when I fan and I have to hold it a certain way. I don't think this will last more than one weekend of fanning without it.
Never again will I go to a festival and be hot! Huzzah!
Check out my website at www.projecthousewife.com for more cool stuff.
Tuesday, October 8, 2013
You've Been Boo'ed!
Happy Tuesday everyone! It's Kris here at Project Housewife and I am going to give a quick tutorial on a favorite Halloween tradition typically known as You've Been Boo'ed.
I first learned about this when I worked in a large office. It was quite fun walking up to your desk and finding a treat and not knowing who it was from. Of course, once you have been boo'ed then you get to be the sneaky one and boo someone else. Even though I experienced this fun little tradition in an office, you can, and I think, should, experience this in your neighborhood. I think that is where the tradition started anyways. I think it's a good way to interact with your neighbors and have a little neighborhood fun.
You can be as creative as you want with this.
First, go to this website - http://www.beenbooed.com/ and print out the sheet they have available.
Then gather everything together that you are going to use to boo a neighbor.

The packaging can be whatever you want. I found this ghost canister at Walmart for $2.50. I always have spare cloth and ribbon lying around so I will be using that as well. You can easily use goody bags or tissue paper.
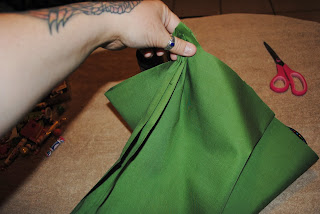
I took the clothe and cut off about a third of it to place inside the canister, just for looks. I gathered up the four corners and then the four folded corners. I turned it upside down and placed it in the canister.


Now it looks like soft green cushioning.

Next. if you have some tall pieces to put in the canister, start with those first, and put them towards the back.

If you want to put some candy in there, I would do that next. I am stalking up on candy because last year we had a lot more trick or treaters than anticipated. I got three bags at the dollar store and just used a few of those pieces for this.

Go ahead and put whatever you have left on top of the candy and in front of the taller pieces.

Next place your filled canister in the center of your cloth or tissue paper. Place the lid next to it, if you are unable to put it on top.

Gather up the four corner's, and then the four folded corner's, and tie it up with a rubber band.

Add some ribbon and you're Boo'ed poem and it's ready to go.
I think, in total, this cost me about $9.00. You can easily go cheaper, and remember, you are only going to be doing this for one or two neighbor's. There's no reason to go broke on this! HAHA
When you are able, sneak over and place this on your neighbor's front porch.
I really hope you enjoyed this tutorial and had fun with it.
Remember to be safe this Halloween!!
***Make sure to visit my website with link's to all my other really cool stuff. http://www.projecthousewife.com/***
Subscribe to:
Posts (Atom)